Saturday, January 30, 2010

Catastrophe Strikes .... and a Fishing Database

Catastrophe strikes, my main computer's motherboard gave up the ghost and died. Well actually not the entire motherboard but the CPU socket is toast. The top (plastic of course) stud where you clip the heatsink two broke loose and when the fan and heatsink fell the suction created by the thermal paste pulled the CPU out bending some pins and apparently damaged the AM2 socket as a new CPU I had but hadn't put in yet wouldn't work either. So I got an upgrade motherboard that can handle AM2, AM2+ and AM3 CPUs so I can use my new Athlon X2 6400+ and 800Mhz DDR2 RAM now and upgrade to a quad core and 1066Mhz DDR2 RAM in a year or so when I feel the need to pep the system up again. I also upgraded my video card so it has more game performance as well as the HDTV/Blue Ray performance I already had.

So although I haven't gotten the 3D and depth maps together yet I did get my fishing database ready for others to download and use or modify or whatever. You need to have Open Office with Base and Writer installed (Everything else is optional for this case) You can download the Fishing Database here. Place it where you like, probably your My Documents folder. I also made a shortcut to it and placed it on my desktop so I can just click it and Open Office Base opens with it loaded. It should look something like this


 Make sure Forms is highlighted on the left and double click Fish Log to open the database. It should look something like this


Many of the entry boxes have drop down lists you can choose data or numbers from, making entry a lot easier. The form is set up in such a way that if something isn't on the list you can add it by manually typing it in and the new word (or number) will automatically be added to the list. Be aware that removing an entry from the list is a little harder as you have to do it in the Form Editor. Those who have some experience in Open Office or Microsoft Office probably won't have much problem modifying the lists or the basic database form.

Once you get some data into the database you can start doing Queries to look for patterns. You do this from the opening window and I added a few simple queries to get you started. To make you own queries you can just use the 'Wizard' to make your own queries, it's fairly self explanatory. 


 There are a couple of more things I would like to do to improve it. First (and undoubtedly the toughest) is make the GPS coordinate entry automatic or at least a lot easier. I'd also like to be able to link a database record to a waypoint on a GPS map. An easier addition would be adding an entry for Water Level Trend so I could note if the river/lake/reservoir is rising, falling or steady. Here's a couple of more screen shots of some entries in my personal database


Actually I had planned on having the netbook apart by now and having started on the hardware mods like touchscreen, adding wireless mouse and Bluetooth, and jacks for 3G and GPS antennas, etc. That still looks to be a week away as I'm doing a major cleaning and rerouting of cables and power lines for the rest of my stuff (I have 4 radios that are all controlled from this computer as well as recording gear). In the next couple of days I'll finally finish the 3D and depth maps and get them posted and hopefully late next week have some photos (and tales) of a dissected Acer 531h netbook.

Wednesday, January 20, 2010

More Custom Fishing Maps

Now I'm going to talk about my favorite source for maps, unfortunately it's only for the state of Iowa. Check your state government website to see if they have a similar thing. Since this was created mainly for agriculture use I'd bet most states with a lot of agriculture will have something like this. Modern farming uses GPS and mapping more and more to keep track of things like crop rotation, fertilizer and pesticide use. The Iowa Geographic Map Server gets a lot of it's current data from USDA National Agriculture Imagery Program.

I usually set it for 1500 x 1500 pixels squares which I can later stitch together into larger maps, for instance I have complete aerial and topographic maps of Pools 15, 16 and 17 on the Mississippi as well as Coralville Reservoir and the Iowa River from the Coralville dam to the dam in Iowa City. Center the map on the area you want by clicking on it and zoom in to 20 meters and hit the Refresh Map button, click on the map to center it better and then choose 1 meter and hit the Refresh Map button again. You can adjust the map again by clicking on it to recenter it. When you get a view you like hit the 'Download map' link at the top and download the 1x1 meter GeoTIFF. This can be imported into most GPS program and is pre-calibrated.

Here is a screen shot from a portion of a 2000x1700 meter (pixel) map in OziExplorer, you may recognize it's the same area as one of the hydrographic map screenshots earlier


Now you can hit the back button and choose another map in the exact same area. The map server has several current years as well as 1930's and 1950's maps and topographic maps. Here is a screenshot from a 1930's map same size same area. Note that this was just before they finished Lock and Dam 16 and flooded the pool. The average river levels are 6-7 feet lower than today


Next is a composite map from the two maps above. This is a little trickier to make because when you make your layers and save the finished picture you lose the geodata in the TIFF header so you have to get it back in there (Or hand calibrate). A basic overview of how I make the maps is first I open The Gimp and open as Layers the two photos with the most current color map on top. Then I adjust the transparency of the top color photo to 30% and save as as TIFF. For some odd reason you can't make this TIFF work in GPS mapping programs (At least in OziExplorer or Fugawi) it does all sorts of weird things when you resize it even though it works fine in most picture viewing programs such as IrfanView. So open it in IrfanView and resave as a TIFF. Next we need to get the geodata back in the EXIF header. Next you need the libTIFF library and GeoTIFF Tools GUI from libTIFF.org. First I open one of the original photo maps and use the GeoTIFF Tools to read the header data with the 'listgeo' button. This will also place the data in the next (2nd) box. In the third box I enter the new layered TIFF I just made and it will automatically sent it to the next (4th) box with '_gl' tagged at the end of the name. Now hit the 'geotifcp_1' button and import the finished image into OziExplorer (Or other mapping program that accepts GeoTIFFs). Here is a screenshot of the same area from the new map


Here's another set of examples, this is the same area in Credit Island Slough as one of the hydrographic maps earlier


The waypoints for the rockpiles are a little bit off, this is mainly due to the way I had to mark them, I nosed my boat up to them while the GPS antenna was in the back of the boat. I tried to nose up to each one from the same direction so they'd all be off about the same


Here's the composite map


And here's another composite map, this time showing the wingdams below the water along side Credit Island


My next post will show you some depth maps I made myself as well as some 3D bottom maps made with Dr. Depth


Tuesday, January 19, 2010

Custom GPS Enabled Fishing Maps

I've spent the last couple of days moving all my map and depth data over from my old laptop to my new netbook. I also sat down and finally worked out a way to make layered maps from GeoTIFF's and retain the EXIF geodata so they can be autocalibrated in my mapping programs. The first set of maps are hydrographic maps made by the US Army Corps of Engineers. You can find them here. The particular map I'm going to be using can be found here.

These maps aren't GPS calibrated and come in two forms, Adobe PDF and Autocad DWF files. You can download free DWF viewers from Autocad. This particular map is a PDF and what I do is blow it up to the size I want and copy the section of the map I want using the 'Snapshot' tool in the 'Tool' menu. Then I paste it into a graphics/photo editing program like Irfanview or The Gimp (Both are free) and then save as a PNG, TIFF, or JPG file. Most mapping programs seem to work best with PNG or TIFF. Next I bring it into my mapping program for hand calibration. Since these maps have a grid in UTM format I have to convert from UTM to lat/long decimal degrees. For this I use another freely available program from the USACE called CorpsCon. Once I convert all the UTM grid lines to lat/long I then calibrate the map in OziExplorer using a minimum of 3 points and usually use as many as possible to make the map more accurate. Now my map is ready to use. Here are some screenshots of my map with Waypoints added.


This is just a general overview of the area I'll be showing. Please note that the depths shown are at Flat Pool which is 2.5 ft so you have to get the current water level and adjust. For instance if the tail is at 5.5 feet you add 3 feet to the shown levels


This map is by the Interstate 280 bridge and it shows my most productive spots for fishing. Last July 6th on a full moon I caught 5 Flathead catfish on spot 1 and 3 more on spot 2 for a total weight of a bit over 50 pounds. Fishing the edge of this drop off and the ledge parallel to the shore has also been very productive for channel cats. These waypoints were originally marked a couple of years before I made this map and it was interesting to see how lined up with the dropoff


This final shot is up in the Credit Island Slough (Davenport, Iowa) and shows 3 rock piles that were once footings for barge piers which are below the surface of the water most of the time. This is an excellent spot for catching sunfish and bluegills for flathead bait but hard to locate without the GPS and map

As far as I know I am the only one that is making fishing maps from these hydrographic maps from the USACE but I have found them to be invaluable. In my next post I'll show you another source of maps I use (My main source) and some maps from it that cover these same areas as well as a unique layered photomap like none I've seen elsewhere.

Thursday, January 14, 2010

I SUPPORT GOOGLE'S CHINA DECISION

I urge every other blogger on Blogspot to make a statement supporting Google's decision to stop playing footsie with the Chinese Communists who refuse to play by Internet Free Speech Rules.

FREE SPEECH FOREVER!!!!

Wednesday, January 13, 2010

Odds and Ends - And A Progress Report

I noticed a little anomaly in the sending the GPS Enable DOS window to the tray using the TrayIt application. If you set it to send the DOS window to the tray then it will do this every time you open a DOS window. You can bring it back simply by clicking on the icon in the tray. To me this isn't a real big deal because I don't use it all that often, mainly when I'm setting up and tweaking a system. If this is an issue for you, don't use the TrayIt application and leave the DOS window open when you enable GPS but since you can get the window back with a single click on the icon in the tray I can't really see why anyone would want to disable TrayIt unless they use the DOS window a lot

I started to disassemble the case to install the touch screen and then decided I still didn't like the way the system was set up. Even though I removed all the Acer bloatware, unneeded Windows programs and tweaked things up I felt strongly that I needed a better way to re-install the system when necessary. I like to do a clean install once every year or two but using the Acer system dics I made means you reinstall all the junk and have to go through the process of culling out the junk and tweaking the system which is time consuming. Also I wanted to install the Tablet PC 2005 SP3 additions which includes not only handwriting recognition apps but all speech recognition and voice control apps which I want to use with a Bluetooth headset and an embedded Bluetooth module. The Tablet PC additions can be found here

Then I used nLite and the instructions on that page to 'slipstream' the Tablet PC additions and preload most of the system drivers. nLite also allows you to tweak many parts of the system and enable/disable your Services which saves a lot of time on re-install. The trickiest part was getting and setting up the proper drivers for the SATA controller so the install doesn't hang. (XP doesn't have any native SATA drivers) That took me a couple of tries to get right so a rewritable disc is recommended. Once you get it right you can copy the rewritable image over to a regular CD for permanent storage and reloading the system. Highly recommended for culling out unneeded Services is Black Viper's website and doing this can significantly lessen the memory 'footprint' and make the system more responsive and more secure.

My main computer has an 80 MB partition with Studio 64 Linux with a 'cubed' Beryl desktop manager that I really like. This is a really efficeint way to work when you have several full screen apps going at once and each desktop can be set up seperately ... and it looks very kewl. I couldn't find a good free version for XP but I have found a couple of reasonably priced ones that I'm experimenting with. One is Think in Byte's Cube Desktop ($19.95) and the other is Otaku Software's Deskspace ($24.95) . I'm leaning towards Cube Desktop because it has a couple of more features like Flip Desktop (Like in Vista) and Window Exposer (Like Mac OS X Expo) and is 5 bucks cheaper.

So basically all I have left before I tear this down and start the touch screen install and other hardware mods is to load in all my map data, import my Fishing Log database (Open Office Base) and copy over my MP3 collection. I'm especially proud of my Fishing Log database because it is much more comprehensive than anything else I've seen and I set it up with a lot of drop down lists to make data entry easier when out on the water. Plus the last time I did any kind of work setting up databases was dBase under DOS 5.0 back in the early 90's so just getting it all to work was an adventure in and of itself. I'll upload the template to the database as soon as I figure out how and how to export and import the data. I'm still learning how to make reports to process the data. The 'learning curve' is pretty steep but the end results so far have been more than worth it and it's time to share it with interested fishermen and fisherwomen

Until next time ....

Friday, January 8, 2010

Comments Now Working

For some reason the comments weren't working properly but I've got them working again.

Sorry for any inconvenience and please post any questions or comments you may have.

Friday, January 1, 2010

Finishing Touches On GPS Enable

Between storms and Holidays and a slight glitch in my GPS setup (More on that later) I've been a little too busy to post the finishing touches on the GPS enable hack. Although the next step isn't necessary to make the GPS work it does lend a professional touch.

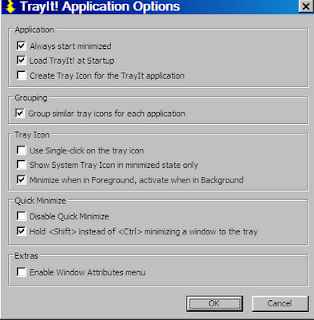
First thing we need to do is go to http://www.teamcti.com/trayit/trayit.htm and download the TrayIt! utility and install it as instructed on the webpage. After you install the utility start it up, click on the Edit button in the Tool Bar and select Options from the drop down list. Set it up so it looks like this:
Click to enlarge

Next click on the Enable GPS shortcut we made last time. Now **right click** on the 'X' in the upper right and this will send the DOS window to the Tray. Right click on it in the Tray and choose 'Place in System Tray' from the list. From now on when you click the Enable GPS shortcut the DOS window will pop up and after a second or two go to the Tray. To end the program right click on the Tray icon and choose 'Close Window'. Since the TrayIt! application runs in the background on start up you can use it to send other windows to the tray. This is nice if you have an application that needs to run but you don't want it taking up space on the Taskbar.

I mentioned earlier that I found a slight glitch in the system. Although all my main programs and every other program I've tried so far works fine, Microsoft Streets and Trips seems to have a bug that rejects the connection as not NMEA compliant even though it is. I tried several different serial port emulators as well as Franson GPS Gate but the results were always the same, everything works except Streets and Trips. If anyone comes across any other GPS programs that don't work with my method of enabling the GPS on the Gobi 1000 module please leave a comment with the program name and version.

I received my touch screen kit Wednesday but I still need to install the programs for Tablet PC 2005 and other desktop/operating system enhancements for touch screen use as well as load all my GPS maps before I'm ready to install it. The kit is for a D-150 and I have a AO531 so it's probably not going to be a solderless install. On the positive side the AO531 has a different screen hinge setup and looks like I should be able to flip the top 180 degrees to make it a Tablet PC style.

Well I'm off to install the Tablet PC 2005 apps and start playing around with desktop enhancements (Hopefully a cubed Beryl/Compiz style interface) . Until next time .....